Help for managing playlist locations
Once you have installed the Playlist Push component you will need to setup your preferences so that playlists are exported automatically to the locations you require. Get started by adding a new location:
- Step 1: Open the foobar2000 preferences dialog (click File → Preferences or use the Ctrl + P keyboard shortcut)
- Step 2: Go to the Tools → Playlist Push preferences page
- Step 3: Click the Add button to setup a location for your playlists or Edit an existing one
The top level preferences page for the Playlist Push component shows a list of the locations that you have created for playlist exports. Each location will have a status field which shows whether the individual location is enabled or disabled.
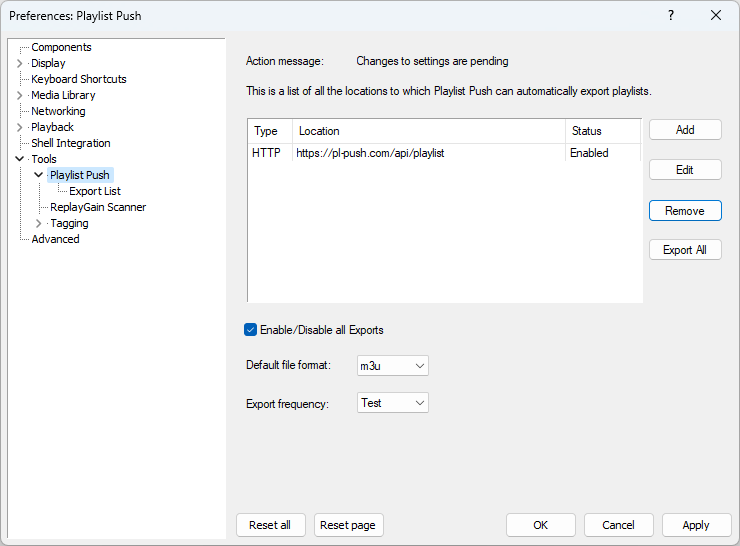
Buttons/Action (Location List)
- Add - Click to add a new location
- Edit - Select location from list and click to edit
- Remove - Select location from list and click to remove
- Export All - Select location from list and click to force all playlist exports for the location. Use this when location is first setup to create an initial snapshot or if you are having problems and want to ensure that all playlists exports are refreshed.
Field Help (Location List)
- Enable/Disable all Exports - Use this checkbox to disable (uncheck) all automatic playlist exports (i.e. for all locations and all playlists).
- Default file format - Each export can specify the file format (m3u, m3u8, fpl or json) required. If an export to a folder does not specify the format and has 'Default' instead, then this field will be used. The 'Default' format for HTTP is always json. With the m3u format if you wish to have Extended M3U then you must enable the option in Preferences → Advanced → Tools → Write EXTM3U playlists.
- Export frequency - The default export frequency is 'On Exit' i.e. all the pending playlists updates will be exported when fb2k is closed.
How to add a playlist location
After clicking on the Add or Edit button from the location list you will see the following window:
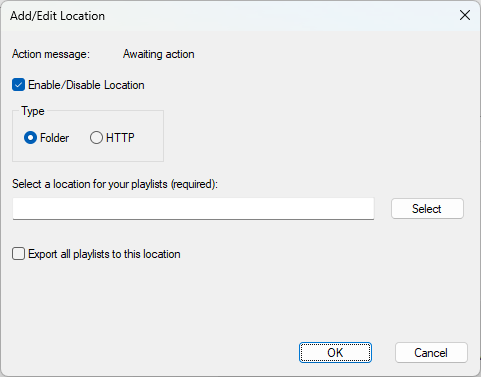
Buttons/Action (Add/Edit Location)
- Select - Click to select the folder for playlist exports.
- OK - Note that when you press OK on the 'Add/Edit Location' pop up window you will see the changes on the location list, but they will not be applied until you click on OK or Apply on the preferences page.
Field Help (Add/Edit Location)
- Enable/Disable Location - Use this checkbox to disable or enable (checked) all automatic playlist exports for this location. A location may be disabled automatically when there is a failure.
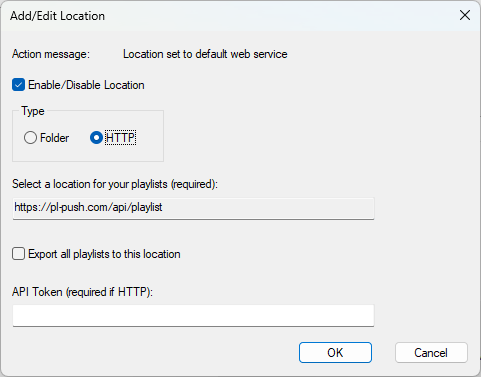
- Type - Select 'Folder' when exporting files to your PC, network or cloud drive. Select 'HTTP' when exporting files to the PL-Push web service for sharing.
- Location - Use the Select button to open a dialog to select the folder for playlist exports.
- Export all playlists to this location - When creating a location, check this box if you want all playlists to be exported to this location. This will automatically create an appropriate playlist export. If only certain playlists should export to this location then leave unchecked and specify which playlists on the 'Export List' page.
- API Token - This is the token generated by this site after registration. Get API Token if you do not have this yet. If you select the 'HTTP' option then the location will be automatically set to this web service, and you must enter an API Token.
Help for managing playlist exports
Once you have installed the Playlist Push component, and setup your locations for the export of playlists, you may then add or manage the export of playlists to these locations.
- Step 1: Open the foobar2000 preferences dialog (click File → Preferences or use the Ctrl + P keyboard shortcut)
- Step 2: Go to the Tools → Playlist Push → Export List page
- Step 3: Click the Add button to add a playlist export or Edit an existing one
The second level preferences page for the Playlist Push component is called the 'Export List' and shows a list of all the exports for your playlists. The 'Export' field shows when the export of any playlist updates will take place, or reports any problems.
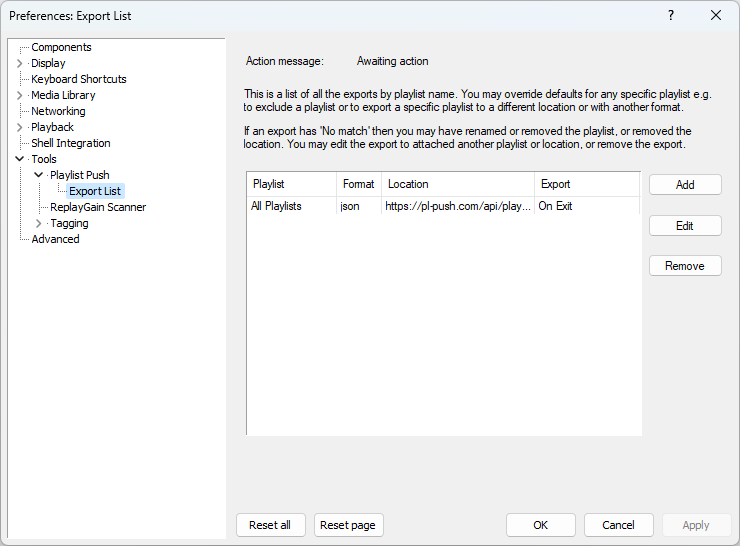
Buttons/Action (Export List)
- Add - Click to add a new playlist export
- Edit - Select playlist export from list and click to edit
- Remove - Select playlist export from list and click to remove
This simplest configuration of this component might involve a single location which is used for all playlists by default and perhaps only one format e.g m3u. You may of course have multiple locations and multiple exports. You may chose to have one network location for all m3u exports, and also an HTTP location (to this PL-Push web service) to which you export (post) both m3u and json formats. A more elaborate approach would involve having exports for each playlist if you wanted to store different playlists in different folders or exclude (disable) certain playlists. A few points to note:
- Each playlist export is linked to one location and one file format.
- Multiple exports can use the same location e.g. if you wanted to export different formats to the same folder.
- Each export may either apply to a single playlist, all playlists or all playlists excluding those with their own exports (with the Allow Override option).
- Default playlists are not included in the 'All Playlists' group. If you want to export them (e.g. playlists with the names 'Default', 'Default Playlist', 'Internet Radio', 'Library Viewer Selection', 'Library Selection' or 'New playlist') then you must explicitly create an export.
- If you have playlists with the same name (there will be a multiple matches message in the 'Export' column) then only the first playlist will ever be found and exported.
- If an export has 'No match' then you may have renamed or removed the playlist, or removed the location. You may edit the export to attached another playlist or location, or remove the export.
How to add a playlist export
After clicking on the Add or Edit button from the export list you will see the following window:
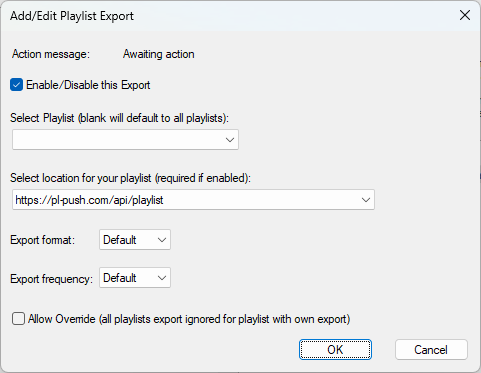
Buttons/Action (Add/Edit Playlist Export)
- OK - Note that when you press OK on the 'Add/Edit Playlist Export' pop up window you will see the changes on the export list, but they will not be applied until you click on OK or Apply on the preferences page.
Field Help (Add/Edit Playlist Export)
- Enable/Disable this Export - Use this checkbox to disable or enable (checked) this export. Useful for excluding a playlist from automatic export of 'All Playlists'.
- Select Playlist - Use the drop down to select playlist or leave blank for export to apply to 'All Playlists'.
- Select Location - Use the drop down to select one of the locations that you hare already setup.
- Export Format - Override default by selecting m3u, m3u8, fpl or json. When an export is disabled for a single playlist export the 'Default' format means all formats are disabled for that playlist.
- Export Frequency - You may select 'On Exit' to override component default.
- Allow Override - Only applicable to 'All Playlists'. Export will ignore any playlist with own export to same format. Useful when you use 'All Playlists' exports for most of you playlists but want to have exceptions for single playlist exports. The exceptions can be to export a particular playlist with format to a different location or to exclude a particular playlist from any export.